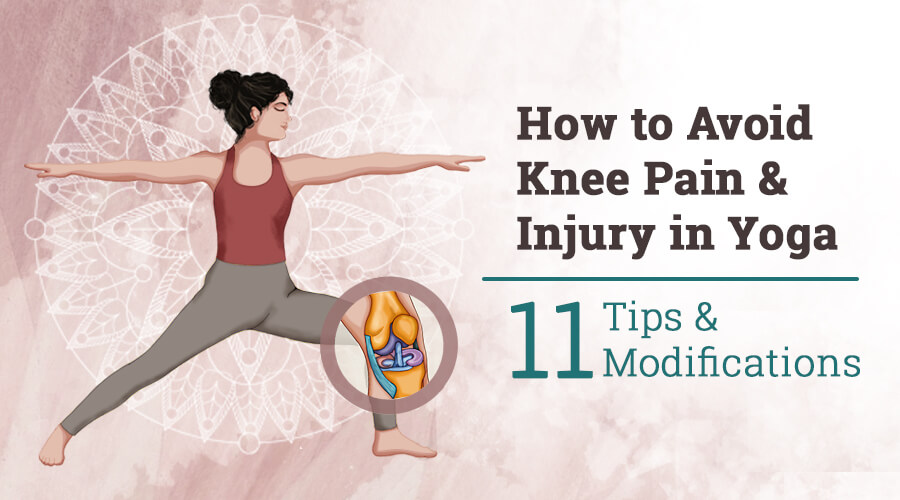
Knee pain in yoga is, unfortunately, a rather common occurrence. And even though yoga can be a great tool for knee injury recovery, people with sensitive knees often have a hard time in a yoga class. In this detailed blog, I am sharing with you 11 tips and modifications on how to prevent knee pain in yoga and how to make sure that your students avoid knee injury.
At the very beginning of this discussion lies the fact that yoga asana practice has been plucked out of its cultural context and placed in the West. Most practitioners forget that in India, sitting on the floor has been a way of life for a long time.
Think about women squatting to cook, workers squatting to build things, and the traditional toilet which requires you to squat down. Therefore, (traditionally) Indian hips and knees are much more flexible than the ones from people from the West. Lotus variations are the norm for many traditional yoga postures, as it was assumed that lotus can be done easily.
In the West, we are used to sitting on chairs, and we hardly ever squat down for anything. So, when yoga was brought to the West, it unfortunately, led to suffering knees. It doesn't mean that we all can never do Lotus. It just means that not everyone should try and if you have the possibility to safely try, it may take a long time until you get to a Full Lotus Pose.
Knee anatomy 101
The knee is highly influenced by the joint below (ankle) and the joint above (hip joint). More often than not, when an injury occurs to the knee, the cause of the injury is directly or indirectly related to some dysfunction in one or both surrounding joints.
Like the ankle, the knee must be strong as it holds a great amount of our body weight. In addition, it must be flexible enough to deal with the adaptations made of the ankle and foot.
Knee issues and injuries are mainly related to one of the ligaments of the knee or the menisci. Below is a short overview of the knee’s anatomy:
Ligaments of the knee
Ligaments allow for and restrict movement. When the ligaments around a joint are in a relaxed position, they allow movement. When they are taut, they restrict movement. When the knee is extended (straight), the ligaments are taut and maximally restrict movement. When the knee is bent, there is more movement possibility.
Most injuries of the knee take place when the knee is bent! And in yoga, most knee injuries take place when a (forceful) rotation of flexed knee takes place.
The four main ligaments of the knee
Collateral ligaments: The two collateral ligaments connect the femur to the tibia, on the inside and the outside of the knee. The medial collateral ligament (MCL) attaches to the meniscus and blends into the joint. The lateral collateral ligament (LCL) is more independent. These two ligaments are in place to keep the knee from buckling inwards or outwards, as well as resist rotation of the knee when it is flexed.
Cruciate ligaments: The so-called cross ligaments of the knee are located on the inside of the knee. They are the primary stabilizer of the knee joint, keeping the femur and tibia close together.
The anterior cruciate ligament (ACL) attaches to the front part of the tibia and runs to the inner part of the bottom of the femur. It keeps the tibia from sliding forward under the femur. The ACL also prevents excessive internal rotation of the flexed knee. The most common injury happens in a case where a partially bent knee is forced into an internal rotation. This takes quite an amount of force and is often seen in ski accidents.
The PCL (posterior cruciate ligament) keeps the tibia from sliding backward under the femur. It is the main force of holding together hyper-extended knees.

The menisci
The menisci (plural) are two semi-circular pieces of additional cartilage sitting on the almost flat area of the tibia. There is one on each side, the medial (inside) and lateral (outside) meniscus of the knee.
The purpose of the menisci is to provide a cup for the femur to rest on top of the tibia. Through its spongy quality, the menisci serve as shock absorbers and make movements, such as flexion, extension, and rotation possible.
The menisci are not fixed in place, they move and distort their shape, are squished, and slide as we move our knees.
For anatomy geeks: What are the muscles around the knee?
There are three main muscles that directly impact knee function: The quadriceps, the hamstrings, the Iliotibial band.
An imbalance in these muscles can cause discomfort or even injury in yoga practice. In a well-structured yoga class, we equally stretch and activate these muscle groups to bring them into a better balance.
Quadriceps: This is a large muscle group that includes the four prevailing muscles on the front of the thigh. Quadriceps literally means four heads. It is the great extensor muscle of the knee, forming a large fleshy mass that covers the front and sides of the femur. All four quadriceps are powerful extensors of the knee joint. They are crucial in walking, running, jumping and squatting. The quadriceps, specifically the vastus medialis and vastus lateralis play the important role of stabilizing the patella and the knee joint during these movements. All four muscles converge around and are attached to the patella and then continue through a ligament (the patellar ligament/tendon) to attach to the top of the tibia.
Hamstrings: There are three muscles that compromise the hamstring group (the biceps femoris, the semitendinosus, and the semimembranosus). The hamstrings at the back of the knee balance the action of the quadriceps. As the knee straightens, the hamstrings get longer. If the hamstrings shorten, the quadriceps get longer. The hamstrings also rotate the tibia when the knee is flexed.
The Iliotibial Band: The ITB runs along the outside of the leg down to the tibia. It is a long piece of fascia that connects to the pelvis via a muscle called the tensor fascia latae. It helps to stabilize the knee, especially during walking and running. With overuse, the ITB can adhere to the fascia of the lateral quadriceps beneath and therefore restrict movements. A loose ITB however might cause instability for running and cycling, a tight ITB can cause pain at the knee when in postures that require external hip rotation
How to prevent knee pain in yoga
In order to prevent knee strain and avoid knee pain in yoga we have to keep two principles in mind:
- Having a basic understanding of how joints are designed to move.
- Knowing the difference between stress/ discomfort and pain.
The knee joint is a hinge joint. This means that the knee can open and close, just like a door. Anatomically speaking, the knee joint mainly allows for flexion and extension, BUT it also allows a small degree of medial and lateral rotation. This rotation can only occur when the knee is flexed. If the knee is not flexed, the rotation happens at the hip joint.
In my experience, treating the knee as if it can’t rotate helps me and my students to keep the knees safe. It’s incredibly difficult to measure or sense the safe range of rotation, as we are engrossed in our practice.
My urgent advice is, treat your knees as if they can only open and close and create any internal or external rotation in a pose solely in your hip joint!
Now, in our yoga teacher training courses, we speak a lot about the functionality of yoga practice, versus an aesthetic approach. Each yoga pose has muscular target areas that we want to place appropriate stress on. That stress can be in terms of feeling a stretch, but it can also be a contraction, an activation. To measure the appropriate amount of stress, we use the tool of the traffic light.
Red represents pain or intense discomfort that does not fade. Orange stands for manageable discomfort and green stands for no discomfort at all. As you can probably guess, we should always aim to be in the orange zone. Practicing within the orange zone of discomfort will make sure that our practice is effective and safe!
Important Note: The knee is no target area. You should NEVER feel any discomfort in your knee. You can feel light discomfort in your quadriceps and hamstrings, but not in the knee itself. So if you feel discomfort in the knee itself, you are in a dangerous red zone and must gently back off immediately!
Experience authentic Hatha Yoga
Get free access to exclusive guided lessons with master teacher Kalyani Hauswirth-Jain
Five tips for every yoga practitioner for how to prevent knee pain in yoga
1. Increase hip-joint mobility
As mentioned at the beginning of this article, the knees are often forced to compensate for the lack of mobility (or stability) in the surrounding joints. In yoga, this applies especially to the hip joint. In postures that require internal or external hip rotation, the knees are at great risk if the mobility is not sufficient, and the yoga practitioner does not recognize that or chooses to ignore it.
Therefore, keeping your knees safe starts with safely increasing the mobility in your hip joint. In that category, we focus primarily on stretching the muscles that resist external rotation, such as the glutes and the 6 deep lateral rotators. A great pose for safely increasing external rotation in the hip joint is Womb Pose (aka Reclined Pigeon Pose). As you don’t use your body weight, this pose is low risk, yet still very effective.
Read more: Open Your Hips with Pigeon Pose for All Levels of Mobility

2. Avoid knee pain by creating awareness of your feet
The knee joint is mainly a hinge joint, but it does allow for some rotation. When we force this rotation, we place our knees in great danger. So, we need to be mindful of any sensations of pain or discomfort close to or in the knee. But sometimes, especially if our bodies are very warm, we perceive more range of motion than is healthy for us. Therefore, I always advise my students to try to stabilize their knee joint by flexing or ‘flointing’ the foot of the leg which is in external hip rotation.
In postures, where the knee is bent at an angle between 45 and 90 degrees, I suggest flexing the foot. An example of such a pose is the Womb Pose and Firelog Pose. In my experience, flexing the foot naturally engages the leg and places the joints in an anatomically more stable position. This helps to facilitate movement of the leg as a single unit from the hip. This, in turn, decreases the chance of an inappropriate rotational strain on the knee joint.
In hip-opening postures such as the Pigeon Pose, where the externally rotated knee is more bent (more closed), flexing the foot can restrict the pose unnecessarily (or place too much strain on the knee joint). In such a case, where there is little space between the calve and thigh, try ‘flointing’ the foot. The “floint” is a stretched (extended) foot, leading with the ball instead of the toe. In other words, it’s a point but with the toes spread and flexed back. I have found this technique to be very useful in stabilizing (and thus protecting) my knee joint in postures where my leg is externally rotated in the hip joint and my knee is almost fully closed.


3. To avoid knee pain, elevate your pelvis or your knees
The knee and hip joint are intimately related in function. Lifting the pelvis in relation to the knees, can increase our perceived range of mobility and therefore prevent knee pain in yoga and reduce the risk of injury. For example, placing a cushion or block underneath the front buttock in Pigeon Pose greatly reduces the risk of straining that knee into an inappropriate rotation.
On the other hand, lifting the knees in relation to the pelvis can also help us keep our knees safe. An example of this is when we place a cushion or block underneath the bent knee in Janu Shirshasana or Ardha Baddha Padma Paschimottanasana. Keeping the knee where we brought it by engaging in a safe external hip rotation prevents us from pressing our knee downward as we fold our upper body forward:


4. Don’t hyper-extend your knees
Hyper-extension of the knee, especially when weight-bearing, can cause strain to the joint, as it puts unhealthy tension on the anterior cruciate ligament (ACL), posterior cruciate ligament (PCL), and popliteal ligaments (along the back of the knee). Over time, regular hyper-extension of the knees might lead to experience swelling, pain, and a limited range of motion. Next to these ramifications to the knee joint itself, hyper-extending the knees will also lead to an exaggerated lumbar curve (hyper-lordosis). If you are prone to hyper-extension, try the following:

5. Improve alignment through balancing
The knee is highly influenced by the alignment of the feet. When the ligaments on both sides of the knees are equally strong, the kneecap slides without restraint and the cartilage below the patella doesn’t wear down.
Balancing postures with a straight standing leg, help to train the muscles in the feet that ensure a healthy arch and optimal weight distribution through your feet.
Balancing postures with the knees bent, such as the Eagle Pose train the functional alignment of the knees, which protects the knees against future injury.
Six modifications for yoga with sensitive knees
1. Don’t completely flex your knees
To prevent knee pain in yoga, make sure to advise your students to avoid completely flexing the knees if they have knee issues or sensitive knees. In seated postures such as the Thunderbolt Pose (Vajrasana), Hero Pose (Virasana) as well as Child’s Pose (Shashankasana) make sure to support the pelvis, so the knee does not have to bend fully. You can even use a rolled blanket as a wedge between the calves and thighs to further protect the knees:


2. Prevent knee rotation at all times
Elevate the pelvis in seated hip-openers and at the same time make sure that the knee is resting and not dangling. Elevating the pelvis works to facilitate the rotation in the hip joint, supporting the knee with rolled blankets or blocks makes sure that the knees don’t depress (and therefore experience rotational force) as we bend forward. So for example, in Baddha Konasana, sit on a block to facilitate a pelvic tilt and by placing a support underneath the knees, protect the knees from rotational forces:

3. Keep your kneecaps off the floor
For many people who suffer from knee pain, kneeling is painful. In yoga classes, these students experience pain in poses such as Cat Pose or Tiger Pose. You can remedy that easily by elevating the shins, so there is no pressure on the kneecaps.

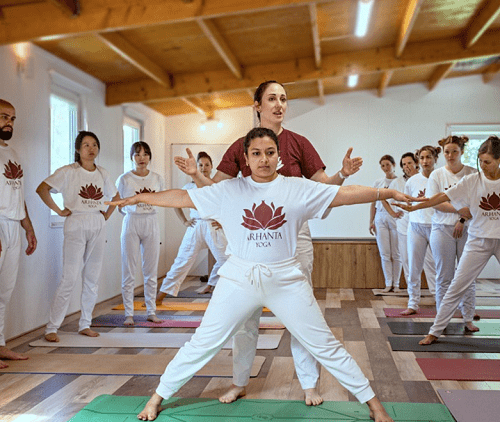
4. Watch your stances
A common mistake in wide-legged standing postures such as the Warrior Poses is to open the stance too wide. Students try to imitate their more flexible teacher or fellow students. They open the feet into a wide stance, aiming to bring the front thigh parallel to the mat. Due to lack of flexibility in the adductor group (inner thighs), their front knee is pulled inward and there’s an inappropriate force onto the inner knee. People with knee issues should not aim to come into a deep warrior stance but keep the feet closer and focus on their knee alignment. The front knee should be stacked above or behind the ankle and the kneecap should point toward the second toe. It helps to keep the arch of the foot active, by lifting the big toe of the ground first and then placing the toes back on the mat, while keeping the arch engaged:

5. Don’t squat too low
People with knee issues or pain should be very careful with lowering the hips below the knees. Therefore, postures such as the Yoga Squat and Crow Pose are counter-indicated and should be avoided.
6. Use a block to align your knees
Place a block just below your knees in standing postures such as Standing Forward Bend and Chair pose. Hug a block between shins in Chair Pose. This modification helps you to maintain a safe knee alignment in which the knees are aligned with your middle toes. The same can be also applied to Standing Forward Bends. Review the variation below that ensure proper knee and pelvis alignment:


Experience authentic Hatha Yoga
Get free access to exclusive guided lessons with master teacher Kalyani Hauswirth-Jain