We spend most of our lives on our feet, but strangely, the moment you step in to try a standing yoga pose, to really stand with awareness, it feels completely foreign.
Standing yoga poses are where most of us begin our practice. They’re not just about building strength (though they definitely do that). They teach you how to find your foundation, how to balance effort with ease, and how to stay grounded while reaching. These standing yoga asanas become the alphabet of your practice. Once you learn them, everything else starts making sense.
Why Standing Poses Are Important

Standing poses work your entire body. Your legs get stronger, your core wakes up, and your balance improves in ways that appear in your daily life, like reaching for something on a high shelf, catching yourself on an icy sidewalk, and holding a plank in a fitness class without your arms shaking.
But it’s more than physical. There’s something about standing poses that builds confidence. It’s the way you learn to trust your own foundation or how you discover you can hold a pose that felt impossible just weeks before. These postures teach you to be steady when things get uncomfortable, a skill that translates into pretty much every challenging moment life throws at you.
Standing yoga postures also create space in the body. They open tight hips, stretch hamstrings that have been sitting at desks all day, and remind your spine what length feels like. Because you’re working against gravity, bearing weight through your legs and feet, they strengthen bones too.
12 Foundational Standing Yoga Poses for Beginners
The standing poses below come from the Hatha Yoga tradition, which is practical, accessible, and incredibly effective. Some you’ll recognize from almost every yoga class you’ve ever taken.
1. Triangle Pose (Trikonasana)

Benefits:
- Strengthens your legs, ankles, and core while stretching your hips, groins, hamstrings, and calves.
- Opens your chest and shoulders.
- Stimulates your abdominal organs and can help relieve stress and improve digestion.
How to practice:
- Stand with your feet wide, about as far apart as your wrists when your arms reach out to the sides.
- Turn your right foot out 90 degrees and your left foot slightly inward.
- Reach your right arm toward your right foot as you shift your hips to the left, then let your right hand rest on your shin, ankle, or the floor.
- Your left arm extends straight up toward the ceiling. The pose creates this diagonal line through your body, from your back heel through your top fingertips.
- Keep both legs straight and engaged. Don’t collapse into your lower side; instead, imagine you’re pressed between two panes of glass, keeping your torso open toward the side of your mat.
Look up at your top hand if that feels okay for your neck. Otherwise, gaze straight ahead or down at your front foot. Hold for several breaths, then switch sides.
Alignment cues: Press your heels firmly into the floor and lift your sitting bones toward the ceiling. Turn the tops of your thighs slightly outward. Lengthen through both sides of your torso equally; don’t let your lower side compress. Stack your top shoulder over your bottom shoulder as much as possible.
Be cautious if you have lower back issues, spinal problems, or hamstring and groin tightness. Keep your front knee pointing in the same direction as your toes. If you feel strain in your lower back, don’t reach down as far; your hand placement matters less than keeping your spine long.
2. Twisted Triangle Pose (Parivrtta Trikonasana)

Benefits:
- Builds strength in your legs while deeply twisting and lengthening your spine.
- Improves spinal flexibility and stimulates your digestive organs.
- Enhances balance and develops core strength.
How to practice:
- Start standing with feet shoulder-width apart. Inhale and reach your arms up beside your ears, lengthening your spine.
- Palms come together, hands in line above your forehead.
- As you exhale, press your right heel down and reach up as you rotate your torso toward your left. Stay here for one breath.
- Now inhale again, and keeping that twist, lengthen your spine and gently bend backward. Your shoulders move slightly behind your hips. Try to deepen the twist, looking diagonally upward.
This standing yoga pose asks a lot from your spine. Keep reaching backward and upward; don’t collapse through your rib cage. Your shoulders will lift but maintain length through the back of your neck. Keep both feet parallel and legs rotating externally.
Hold as long as you can breathe evenly, then release and switch sides.
Alignment cues: Keep your feet parallel and both legs engaged, rotating externally. Don’t collapse at the rib cage; keep reaching backward and upward. Your shoulders will naturally lift, but keep the back of your neck elongated. Generate the twist from your torso, not just your arms.
Skip this one if you have lower back issues, spinal problems, or tight hamstrings and groins that make rotation uncomfortable. The combination of backbend and twist can be intense if you’re dealing with any spinal concerns.
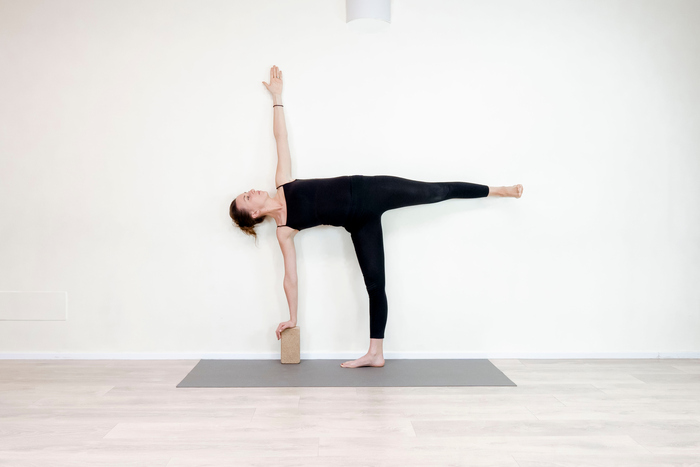
3. Half Moon Pose (Ardha Chandrasana)
Benefits:
- Strengthens your ankles, knees, and legs while stretching your groins, hamstrings, and calves.
- Opens your chest and shoulders.
- Improves coordination and sense of balance.
- Helps relieve stress and improve digestion.
How to practice:
- Begin in Triangle Pose on your right side, left hand on your left hip. Inhale, bend your right knee, and slide your left foot about 15 to 30 centimeters forward.
- At the same time, reach your right hand forward, at least 12 inches beyond the little-toe side of your right foot.
- Exhale, press your right hand and right heel firmly into the floor, straighten your right leg, and lift your left leg until it’s parallel to the floor (or slightly above).
- Push actively through your left heel to keep the raised leg strong. Most of your weight stays in the standing leg; your lower hand is just helping you balance, not holding you up.
- Raise your top arm perpendicular to the floor. If your balance feels steady, slowly lift your gaze to look up at your raised hand.
This standing yoga asana is all about finding stability in an unstable position.
Alignment cues: Lift the inner ankle of your standing foot strongly upward, as if drawing energy from the floor into your standing groin. Press your shoulder blades firmly against your back torso and elongate your spine. Keep rotating your upper torso; aim to bring the top shoulder right above the lower shoulder. Reach out through both your raised heel and the crown of your head.
Be cautious if you have hamstring or groin issues or if you deal with hypertension. If you have high blood pressure, keep your head elevated above heart level by using a block underneath your lower hand.
Don’t lock (and hyperextend) your standing knee; keep it active with your kneecap aligned straight forward. If your neck feels tight, look down toward the floor instead of up. If you feel dizzy easily, keep your gaze on your lower hand.
What helps: If your hamstrings are tight, use a block under your lower hand. It changes everything. You can also keep your upper hand on your waist instead of extending it upward.
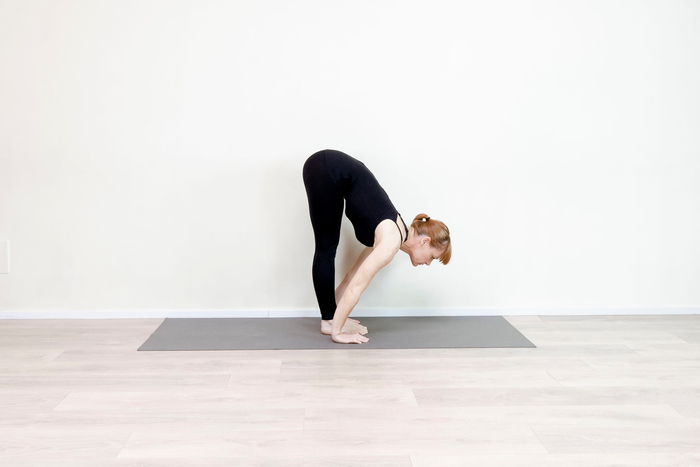
4. Standing Forward Bend (Uttanasana)
Benefits:
- Stretches your hamstrings, calves, and hips while strengthening your thighs and knees.
- Calms your mind and helps relieve stress, anxiety, and mild depression.
- Stimulates your liver and kidneys.
- Can help relieve headaches, insomnia, and fatigue.
How to practice:
- Stand with your feet together or hip-width apart.
- Exhale and fold forward from your hip joints, not your waist.
- With straight legs, bring your palms or fingertips to the floor slightly in front of or beside your feet.
- With each inhale, lift and lengthen the front of your torso just a little. With each exhale, release more fully into the fold.
- Let your head hang from the root of your neck, which sits deep in your upper back between your shoulder blades.
To come out, bend your knees until your torso touches your thighs, then press your heels down and roll your spine up slowly, vertebra by vertebra. Your head comes up last.
Alignment cues: Focus on lengthening the front of your torso as you move deeper into the pose. Press your heels firmly into the floor and lift your sitting bones toward the ceiling. Turn the tops of your thighs slightly inward. Let your head hang from the root of your neck, that deep spot in your upper back between your shoulder blades.
Be cautious if you have hypertension, lower back issues, or spinal problems. If your hamstrings are tight or you feel strain in your lower back, bend your knees. There’s no prize for straight legs if your back is screaming at you. Instead of placing your palms on the floor, you can hold the backs of your ankles or cross your forearms and hold your elbows.
5. Tree Pose (Vrksasana)

Benefits:
- Improves balance and stability in your legs.
- Strengthens your thighs, calves, ankles, and spine.
- Stretches your groins, inner thighs, chest, and shoulders.
- Helps develop concentration and focus.
How to practice:
- Stand with your feet hip-width apart.
- Shift your weight firmly onto your left foot.
- Slowly bend your right knee and bring your right foot to rest against your inner left thigh (or calf, just not directly on your knee joint).
- The sole of your foot presses into your leg, and your leg presses back into your foot.
- Bring your hands to your chest in a prayer position.
- Once you’re stable, you can raise your hands overhead, keeping them in line with your forehead.
Find a focal point at eye level and don’t let your gaze wander, that’s half the battle with balance; where your eyes go, your body follows.
Alignment cues: Ground down firmly through your standing foot. Keep your pelvis neutral; don’t stick your hip out to the side. Lengthen your tailbone toward the floor. Press your foot and inner thigh together with equal pressure. Keep your gaze steady on one point.
Be cautious if: You have high or low blood pressure, or you’re dealing with insomnia or headaches. If you have ankle or knee issues, keep your foot lower on your leg.
The wobble is normal. Balance isn’t about being perfectly still; it’s about making constant tiny adjustments. Your standing ankle is working overtime, and some days you’ll be steadier than others. That’s just how bodies work.
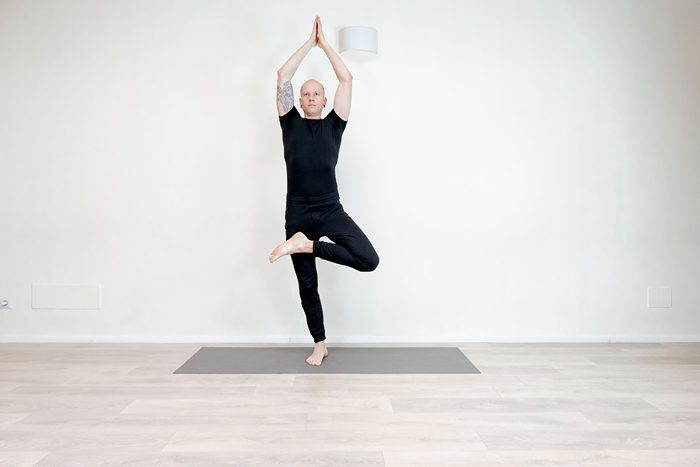
6. Half Lotus Tree Pose (Ardha Padma Vrksasana)
Benefits:
- All the benefits of Tree Pose, plus deeper hip opening and increased flexibility in your hip rotators.
- Challenges your balance at a more advanced level and strengthens concentration.
How to practice:
- Start standing, feet hip-width apart.
- Shift your weight onto your left foot.
- Moving slowly (and I mean slowly), bend your right knee upward toward your chest.
- Bring your right heel to rest as high as you can on the front of your left thigh or hip, sole facing the ceiling.
This is the Half Lotus position, and you should only attempt this if you’re experienced with folding safely into it. Don’t force anything. The rotation has to come from your hip joint, not your knee.
Gently allow your right knee to drop toward the floor until it’s parallel with your other knee. Hands in prayer position at your chest, then raise them toward the ceiling once you’re stable.
Alignment cues: Generate the rotation at your hip joint as you fold your leg into Half Lotus; never torque your knee. Elongate your spine as if you’re trying to touch the ceiling with your skull. Don’t stick your buttocks out to keep your foot in place. Instead, release your tailbone toward the floor and maintain alignment through your spine. Avoid forcing your knee backward; no strain in your knee region.
Skip this if you have tight hips, knee issues, ankle problems, or any of the contraindications for regular Tree Pose. Don’t try to keep your foot up by sticking your buttocks out or forcing your knee down. If your foot doesn’t reach your upper thigh or keeps slipping, work on hip rotation first, cradle your lower leg and balance like that, or practice classical Tree Pose instead.
7. Eagle Pose (Garudasana)
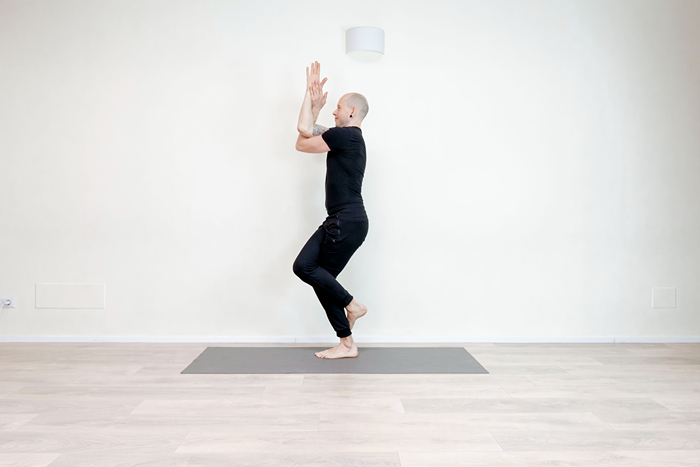
Benefits:
- Strengthens your ankles, calves, thighs, and hips.
- Stretches your shoulders, upper back, and outer thighs.
- Improves concentration, balance, and sense of body awareness.
- The compression can help relieve minor aches in joints.
How to practice:
- Stand with feet hip-width apart.
- Bend both knees slightly, lift your right foot, and balance on your left.
- Cross your right thigh over your left, point your right toes toward the floor, then hook the top of your right foot behind your lower left calf.
- Stretch your left arm straight forward.
- Wrap your right arm from below around your left arm and bring your palms together (or as close as they’ll get).
- Forearms perpendicular to the floor.
Your limbs are wrapped up like a pretzel, and there’s something almost claustrophobic about it. But that’s kind of the point. You’re creating compression, and then, when you release it, everything opens.
Alignment cues: Keep your shoulder blades wide and drawn toward your waist. Come as low as you can without sticking your buttocks out; aim for shoulders over hips and hips over ankles. Keep your weight distributed evenly over the entire sole of your standing foot.
Be cautious if you have the same issues as Tree Pose, high or low blood pressure, insomnia, or headaches. Also be cautious if you have tight hips, spinal issues, or pelvic instability. If you have knee problems, be gentle with how deeply you bend.
If the full wrap isn’t happening: Cross your legs at your thighs without hooking your foot. For extra stability, press the big toe of your raised leg foot against the floor. For the arms, just press your palms together in front of your face if you can’t wrap fully.
8. Balancing Stick Pose (Tuladandasana)

Benefits:
- Strengthens your legs, ankles, shoulders, and back muscles.
- Improves balance, posture, and full-body coordination.
- Tones your abdominal muscles and hip flexors.
- Develops focus and mental clarity.
How to practice:
- Stand with feet hip-width apart.
- Inhale and raise your arms toward the ceiling, palms facing each other.
- Step forward with your right foot, then slowly transfer all your weight onto it as you begin to lift your left foot off the floor.
- Your spine stays straight.
- Continue to raise your left leg behind you as you bend forward. You’re creating one long line from your fingertips through your torso to the heel of your back foot. All of it parallel to the floor.
- Look at a point below you on the floor. Keep the back of your neck long and reach out through your fingertips and back heel simultaneously.
Alignment cues: Keep your neck elongated and shoulder blades drawn down your back toward your waist. Your arms, torso, and raised leg should be positioned relatively parallel to the floor. If your pelvis tilts, release the hip of the raised leg toward the floor until your two hip joints are even and parallel.
Be cautious if you have the same issues as Tree Pose. Also, if you have lower back problems, be mindful of keeping your spine straight rather than arching.
What helps: You can keep your hands folded in front of your chest in a prayer position or your arms alongside your body; just create opposition between your back heel and the crown of your head. If balancing is challenging, use a chair or wall as support underneath your hands.
9. Warrior 1 (Virabhadrasana I)
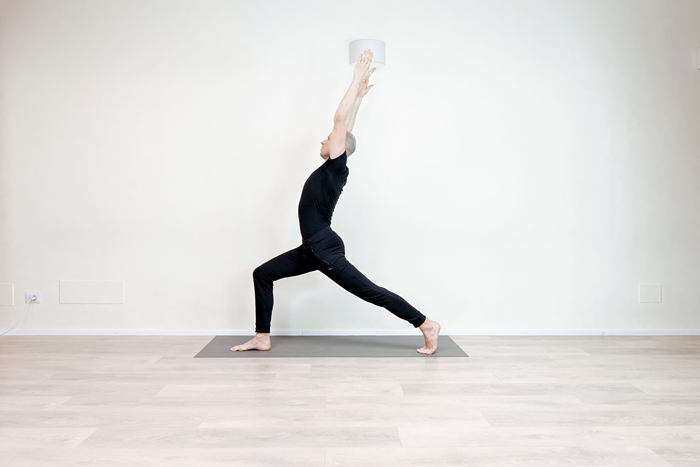
Benefits:
- Strengthens your shoulders, arms, legs, ankles, and back.
- Stretches your chest, lungs, shoulders, neck, belly, and groins (especially your hip flexors).
- Opens your hip flexors and improves focus, balance, and stability.
- Builds stamina and confidence.
How to practice:
- Stand with feet wide, about below your wrists when your arms extend sideways.
- Raise your arms parallel to the floor, reaching actively out to the sides.
- Turn your left foot in 45 to 60 degrees and your right foot out 90 degrees.
- Align your right heel with your left heel.
- Exhale and rotate your torso to the right, squaring the front of your pelvis with the front edge of your mat as much as possible.
- Bring your hands overhead, reaching toward the ceiling.
- With your left heel anchored firmly, exhale again and bend your right knee over your right ankle.
- Your shin (tibia) should be perpendicular to the floor, your thigh ideally parallel to it. Lift your gaze and look up at the space between your palms.
Alignment cues: The kneecap of your bent leg should be slightly behind or right above the center of your ankle; keep at least a 90-degree angle. Aim to keep your hips as square as possible while keeping your back heel firmly grounded. Press down through the outer edge of your back foot and keep your back leg straight. Draw your shoulder blades downward toward your waist and keep the back of your neck elongated.
Be cautious if you have the same issues as Tree Pose. Also be cautious if you have hamstring or groin issues. If you have tightness or pain in your neck, look straight ahead instead of up. If you have shoulder pain, keep your arms reaching sideways just below shoulder-blade level.
What makes it accessible: If you feel unstable with a heel-to-heel alignment, create a little gap between your heels for more stability.
10. Warrior 2 (Virabhadrasana II)
Benefits:
- Strengthens and stretches your legs and ankles.
- Stretches your groins, chest, lungs, and shoulders.
- Stimulates your abdominal organs.
- Increases stamina and builds concentration and grounding energy.
How to practice:
- Same wide stance as Warrior 1.
- Arms parallel to the floor, reaching out to the sides.
- Keep your left foot parallel to the back of your mat and turn your right foot out 90 degrees.
- Align your right heel with the arch of your left foot.
- Exhale and bend your front knee directly over your ankle.
- Turn your head to gaze out across the tip of your right middle finger.
- Unlike Warrior 1, your pelvis stays flat here, both hip joints facing toward the side of your mat.
- Your arms align directly over your legs.
- Front shin perpendicular to the floor.
- Sink your hips low, eventually bringing your front thigh parallel to the floor if you can.
- Press down through the outer edge of your back foot while keeping that leg straight. Your torso stays perpendicular to the floor, head directly over your tailbone.
- Don’t lean toward your front leg; that’s the temptation, but resist it.
Alignment cues: Keep your pelvis flat with both hip joints facing toward the side of your mat as much as possible without your front knee rolling inward. Your arms should align directly over your legs. Reach actively from fingertip to fingertip with palms facing down. Your front shin should be perpendicular to the floor. Sink your hips low, eventually bringing your front thigh parallel.
Make sure your front shin stays vertical; widen your stance if your knee moves past your ankle. Press down through the outer edge of your back foot while keeping your back leg straight. Keep your torso perpendicular to the floor, head directly over your tailbone. Broaden across your collarbones and lengthen the space between your shoulder blades.
Be cautious if you have the same issues as Tree Pose. Also be cautious if you have hamstring or groin issues.
It burns, and that’s the point. Warrior 2 teaches you to hold steady when your legs are shaking and your mind is saying, “Get me out of here.” If you feel unstable with heel-to-arch alignment, go for heel-to-heel, or allow a little gap between your heels.
11. Mountain Pose (Tadasana)
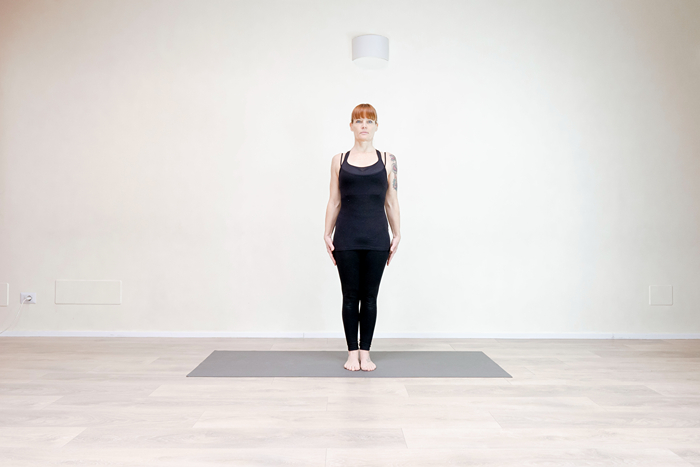
Benefits:
- Improves posture and body awareness.
- Strengthens your thighs, knees, and ankles.
- Firms your abdomen and buttocks.
- Relieves sciatica.
- Reduces flat feet.
- Establishes the foundation for all other standing yoga postures.
How to practice:
- Stand with your feet together or hip-width apart.
- Distribute your weight evenly across both feet.
- Engage your thighs, draw your belly in slightly, lengthen through your spine, and let your arms hang naturally by your sides.
It’s active stillness. Every part of you is working, subtly, but working. Your arches are lifting, your legs are engaged, your spine is lengthening, and your shoulders are drawing down away from your ears.
Alignment cues: Ground down evenly through all four corners of both feet. Engage your thigh muscles and lift your kneecaps (without locking your knees). Slightly engage your lower belly. Lengthen your tailbone toward the floor. Roll your shoulders back and down. Keep your arms alongside your body with palms facing forward or toward your thighs. Align your head directly over your spine with your chin parallel to the floor.
Contraindications: There are generally no contraindications for Mountain Pose, making it accessible for most practitioners. If you have headaches or low blood pressure, be mindful of any dizziness.
Mountain Pose teaches you what proper alignment feels like. Once you know it here, you can find it in every other standing yoga posture.
12. Upward Bound Pose (Urdhva Hastasana in Tadasana)

Benefits:
- Stretches your belly and improves digestion.
- Opens your shoulders and armpits.
- Strengthens your calves and ankles.
- Improves balance and concentration.
- Energizes your entire body.
How to practice:
- Stand with feet together.
- Interlock your hands above your head, palms facing upward.
- Inhale, stretch your hands as high up as you can, and let your heels lift off the floor.
- Keep reaching up and look diagonally upward or straight ahead.
- Press your heels toward each other to stabilize your ankles.
- Come up as high as you can on your toes.
In your effort to make yourself as tall as possible, your shoulders will probably lift; that’s fine. Keep your core engaged and your spine in its natural curve. Don’t overarch your lower back.
Alignment cues: Press your heels toward each other to stabilize your ankles. Come up as high as you can on your toes. Keep your core engaged and your spine in its natural curve; avoid over-arching your lower back. In your effort to reach up, your shoulders may lift, but try to maintain some length through your neck.
Contraindications: There are no general contraindications for this pose. However, like Chair Pose, this one becomes demanding quickly. If you feel dizzy or start sweating heavily, release. If balancing on your toes is too challenging, keep your feet flat on the floor. If the pose causes too much tension in your shoulders and neck, keep your hands in a prayer position in front of your chest instead.
Final thought
These 12 standing poses form the backbone of most yoga practices you’ll encounter. Some days they’ll feel strong and steady. Other days you’ll wobble in Tree Pose or shake like crazy in Chair Pose. That is completely normal, not a failure.
The key (if there is one) is showing up consistently and noticing what’s happening in your body as you move through these standing yoga poses.
Start with a few of them. Maybe Triangle, Warrior 2, and Tree Pose. Get comfortable there before adding more, or jump in and try them all, seeing which ones challenge you and which ones feel surprisingly accessible.
If you are ready to improve your practice, you can explore our 200-Hour Hatha Yoga Teacher Training and many more in detail, giving you the knowledge and confidence to teach or simply practice with greater understanding.
All pose instructions in this guide are adapted from our comprehensive Hatha Yoga manual, developed through decades of teaching experience at Arhanta Yoga.