The 1970 British Cohort Study (BCS70) is following the lives of around 17,000 people born in England, Scotland and a single week in 1970 until today. A recent BBC article stated that as per this study, around 21% of the UK’s population who’s in their late 40s suffer from recurrent back problems.
Not too surprisingly, a growing number of these cases are due to sedentary lifestyles, extensive work hours, bad postures, and a habit of slouching. Practising yoga in the right sequence not only reduces back pain but also prevents it from recurring. It greatly helps in releasing deeply held tensions and provides strength, flexibility, and comfort to the back region.
So how exactly does yoga work to relieve a person’s back pain? Is there something you need to know when designing a yoga sequence for back pain?
Get to know more as you read on.
When teaching yoga, you will have many students who are suffering from chronic lower back pain. Lower-back pain is also often the reason that a person starts a yoga practice. They are looking for a way to deal with, or even heal, their back pain. Therefore it is of great benefit for your students if you know how to best guide them in the practice of yoga for lower back pain relief.
What Causes Back Pain?
General lower back pain is experienced differently from person to person. But it is mostly a constant, disturbing factor in their life that doesn't seem to have a clear medical cause.
The causes of chronic lower back pain are complex and can be influenced by many factors such as:
- postural patterns,
- muscular tension,
- mental stress,
- lack of exercise or too much exercise,
- job requirements, and
- old injuries
Most back pain starts with postural distortions, which result in an imbalance in the fascia and muscle tissues. Postural distortions are often caused by repetitive movements or habitual patterns such as extensive sitting or slouching. Because the activity is repeated so often the body naturally develops imbalances in strength and flexibility in the front, the back or the sides.
Most people today are sitting most of the day. This sedentary lifestyle leads to tight hip flexors (quadriceps and psoas) which in turn can cause compression of the front of the vertebrae. This will lead to a decrease in the lumbar curve and can eventually contribute to (for example) herniated discs.
Yoga for Back Pain Relief: Myth or Truth?
Yoga in general greatly increases body awareness and improves posture. Many yoga teachers even claim that yoga can be more beneficial for lower back pain than conventional physical therapy. Even though this might seem an extreme statement, there is scientific evidence supporting this claim. Several studies indicate that yoga may be an effective treatment for chronic or recurrent low back pain. In one particular study, conducted in 2011 at the University of York, Heslington, United Kingdom, the objective was to compare the effectiveness of yoga versus the usual care for chronic low back pain.
The results look promising at first: 93 (60%) patients offered yoga attended at least 3 of the first 6 sessions and at least 3 other sessions. The yoga group had a better back function at 3, 6, and 12 months than the usual care group. The yoga and usual care groups had similar back pain and general health scores at 3, 6, and 12 months, and the yoga group had higher pain self-efficacy scores at 3 and 6 months but not at 12 months. However, only two of the 157 usual care participants, but 12 of the 156 yoga participants, reported adverse events. They reported increased pain after 12 months of the study.[1]
What is important to read out of these results is, that only if applied properly and with the correct understanding of anatomy (and with the guidance of the treating physical therapist), yoga can be a great tool against chronic back pain. But yoga can also have adverse effects. Certain postures, when practised incorrectly for the individual anatomy and issues of a person, can worsen the cause of chronic back pain.
Studies on Yoga & Back Pain Relief
Recent studies have suggested that a carefully adapted yoga sequence can reduce chronic lower back pain and improve a person’s ability to walk and move. NCCIH (National Center for Complementary and Integrative Health) funded a study of 90 people with chronic lower back pain which showed that the people who practised Iyengar Yoga had significantly less pain, disability and depression after 6 months.[2]
Dr. Padmini Tekur and co. conducted a 7 day trial at the Swami Vivekananda Yoga Research Foundation with 80 patients suffering from chronic lower back pain. The patients were divided into 2 groups, one group following yoga therapy and the other following physical therapy. The results showed that yoga practice is more effective than physical therapy in improving spinal mobility and reducing pain, anxiety and depression.[3]
How Yoga Practice Can Relieve Back Pain
- First of all, yoga exercises strengthen the back muscles and the abdominal muscles. Both of those muscle groups are essential for keeping a proper and straight body posture and for movement of the body. By strengthening those muscles and increasing their control and awareness, back pain can be significantly reduced or avoided.
- Secondly, besides strengthening, yoga exercises also stretch the muscles and allow them to relax. People with lower back pain can benefit a lot from stretching not only the back muscles but the entire body. By stretching the hamstring muscles, for example, the motion of the pelvis expands and tension and stress in the lower back are reduced.
- Finally, yoga exercises stimulate blood flow throughout the body, allowing nutrients to be carried through the body and toxins to be removed from the body. As a result, overall nourishment of the lumbar muscles and soft tissues is improved.
30 Minutes Yoga Asana Practice for Lower Back Pain Relief
When teaching this sequence, or any other sequence, to a student with chronic lower back pain, request them to ask their doctor or physical therapist for any advice and contraindications. Once you know which positions or exercises you must avoid and which are highly recommended you can still modify the practice. Generally speaking, a yoga practice for lower back pain relief, should focus on the following key points:
- Lengthening the hip flexors
- Re-establishing a healthy lumbar curve
- Improve mobility in the front of the body, with chest openers and backbends
- Strengthening the muscles of the lower back
- Gently activating the core
- Practice mental relaxation and concentration
Experience authentic Hatha Yoga
Get free access to exclusive guided lessons with master teacher Kalyani Hauswirth-Jain
1. Surya Namaskara For Back Pain
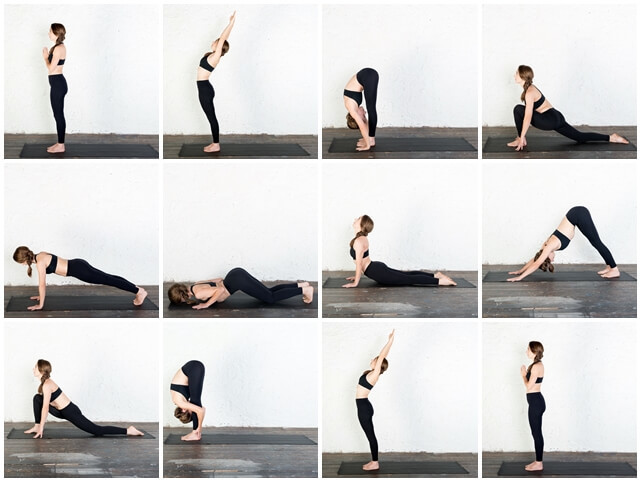
Surya Namaskar for back pain relief is a great place to start! You can begin your practice with 5-7 minutes of Surya Namaskara. Surya Namaskara is an excellent warming-up exercise, for back pain relief designed to warm up the spine and subsequently the limbs. The series of steps provides a great way to lengthen and strengthen back-pain related muscles, such as the hamstrings, hip flexors, lower back and abdominal muscles.
Time to Practice: How to practice Classical Sun Salutation
After completing the warming-up with Surya Namaskara, lie down in Shavasana (Corpse Pose) until your breathing becomes slow and steady again.
2. Sarvangasana | Shoulderstand
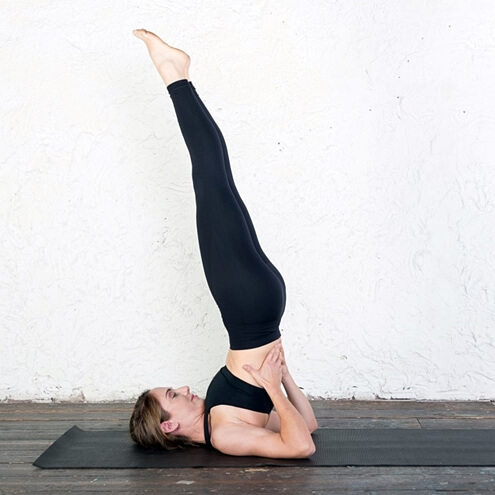
Sarvangasana, or Salamba Sarvangasana, is a pose that helps to stretch the upper chest and and body muscles while gently engaging the core. It is a calming pose that helps to activate our most important postural muscle, the Psoas muscle, during our effort to hold the pose as straight and steady as possible. Hold this pose, if necessary with the support of a folded blanket underneath you shoulder girdle, for 30 - 60 seconds. Then drop your feet half-way behind your head and roll down vertebrae by vertebrae, until your back is resting on the mat. If you feel tightness or pain in your lower-back during the hold, release earlier and hug your knees gently toward your chest after rolling down.
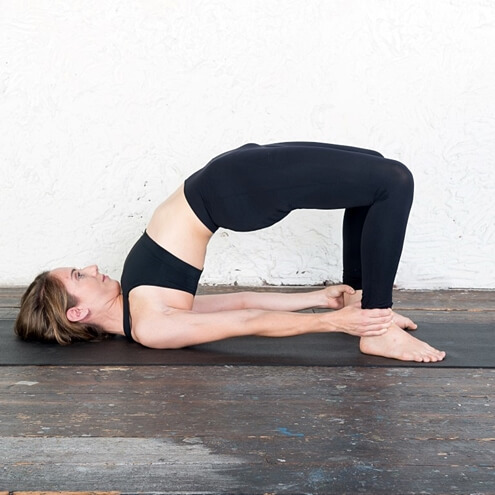
3. Ardha Setu Bandhasana | Half Bridge Pose
Ardha Setu Bandhasana is an excellent pose to strengthen and activate your lower back muscles and glutes. As you contract the back body to lift yourself into the pose you activate them. The lower-back and glutes are a muscle group that is often weak and tight due to lifestyle and wrong posture. Activating them in this pose, improves the blood flow into their tissue and revitalizes them. At the same time, this pose provides a gentle stretch of the chest, abdominal muscles, quadriceps group and the psoas. Hold the pose for 30 - 60 seconds, then roll over one side to come into Child's Pose.
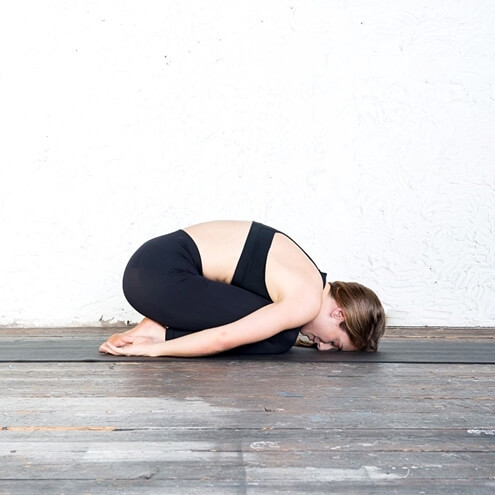
4. Shashankasana | Child's Pose
Child's Pose is a relaxation pose that also gently stretches the entire backside of the body. Make sure that both your head and hips are rested. If necessary place a cushion underneath your buttocks and your forehead on your stacked fists. As you hold the pose, focus on breathing into your belly and lower-back. Hold the pose for 1-2 minutes then move on to Anahatasana.
Read more: How to correctly practice Half Bridge Pose
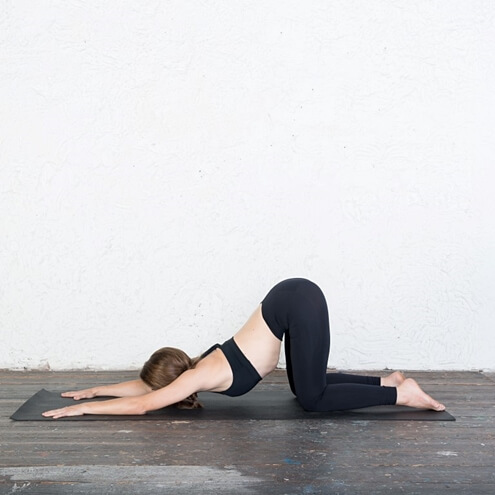
5. Anahatasana | Melting-Heart Pose
The Hart-Melting Pose is a great pose to bring more mobility and opening to the chest and middle back. But it also gently stretches the glutes and lower-back muscles, helping to re-establish a healthy lumbar curve. To come into this pose, come on all fours. Arch your lower back and place your elbows on the mat, below your shoulder (keeping your pelvis above the knees). From here start to straighten the arms and reach with your chest and chin to the mat. If your chest isn't resting on the mat, support it with a folded blanket. If your neck feels tight, you can also rest your forehead on the ground. Stay here for 1-2 minutes and breathe deeply. After releasing the pose, rest in Child's Pose again for 30 - 45 seconds.
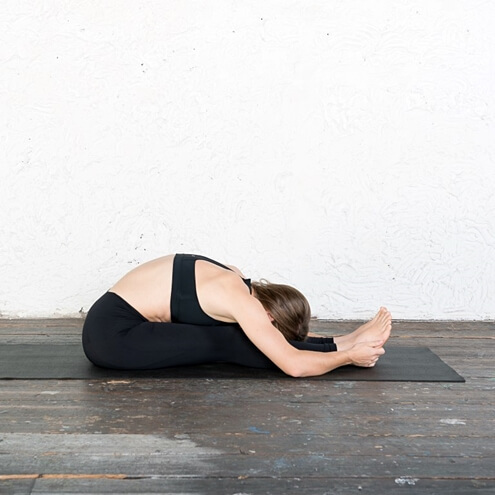
6. Paschimottanasana | Seated Forward Bend
This is one of these poses that can do more damage than good if practiced incorrectly. The Seated Forward Bend requires flexibility in the glutes and hamstring and if these muscles are tight, the pose can strain (and even injure) the lower-back. It is very important that you create the forward fold at your pelvis, not your lumbar spine. If flexibility doesn't allow this, bend your knees and rest them on a folded blanket. Keep your lower back elongated and do not try to bring your nose to the knees, instead reach up and out through the crown of your head. Hold this pose for 1-2 minutes, then lie down on your belly and rest for 30 seconds before moving on to the next asana.
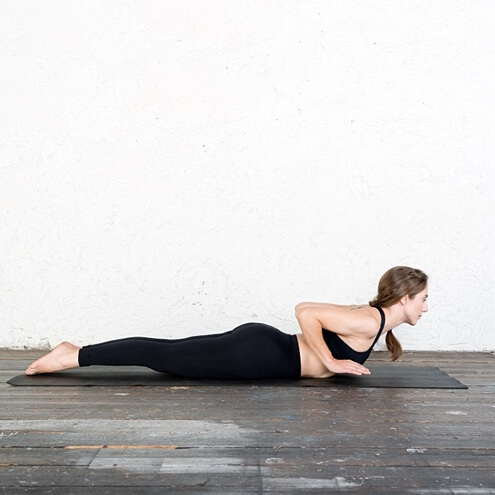
7. Bhujangasana | Classical Cobra Pose
Classical Cobra Pose is excellent for activating and revitalizing tired and weak lower-back muscles. It might be a bit too heavy if you are suffering from chronic lower-back pain. In this case you can bring your elbows on the mat, below your shoulders. If you choose this modification, gently engage your core to protect your back. Hold the full pose for 30 - 60 seconds, or the supported pose for 1 - 2 minutes. Then, rest on your belly or in Child's Pose.
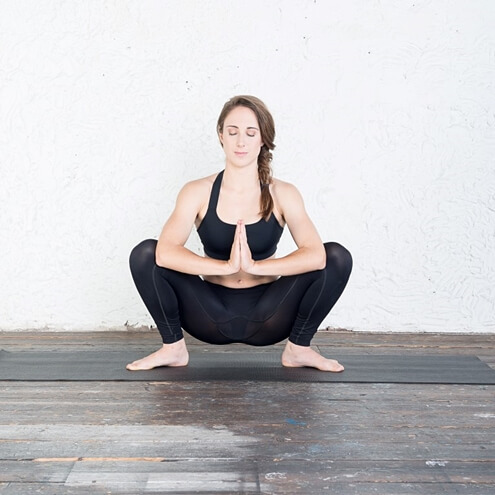
8. Malasana | Garland Pose or Yogic Squat
The Garland Pose is excellent for elongating the lower back and stretching the inner thighs. The inner thighs are often tight in people due to prolonged sitting and their tightness can have a negative effect on our posture, and therefore on our back. Many people struggle to align your knees above your second toe, or to keep your heels on the mat. In this case a block or folded blanket underneath the heels are a great help. Hold the pose for 1-2 minutes.
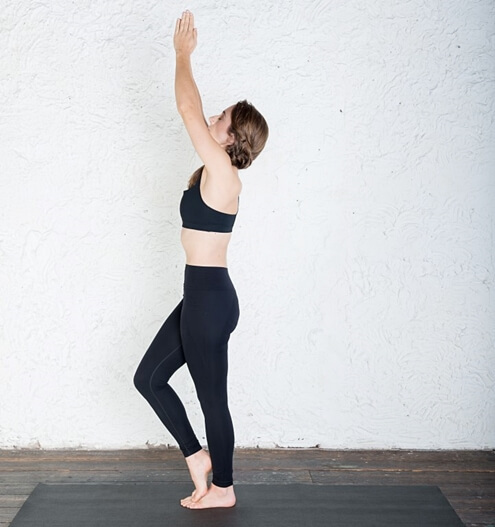
9. Eka Pada Tadasana | One-Legged Mountain Pose
Standing balancing postures such as the One-Legged Mountain Pose are very beneficial for bringing the awareness to postural issues. This pose challenges the sense of balance and therefore requires the intricate muscles surrounding the spine and pelvis to work together in harmony. Postural tendencies - such as for example hyper-extend the lower spine, or tuck the tailbone under, or lift the ribs, or round the middle back too much - become apparent in this pose. Regular practice of this pose will increase the awareness of a healthy and balanced standing posture in daily life as well. Hold the pose for 1 minute per side, with the eyes closed if possible. Then finish the practice with 5 - 10 minutes of Final Relaxation.
Resources
[1] https://www.ncbi.nlm.nih.gov/pubmed/22041945
[2] https://nccih.nih.gov/research/results/spotlight/112409.htm

Experience authentic Hatha Yoga
Get free access to exclusive guided lessons with master teacher Kalyani Hauswirth-Jain

