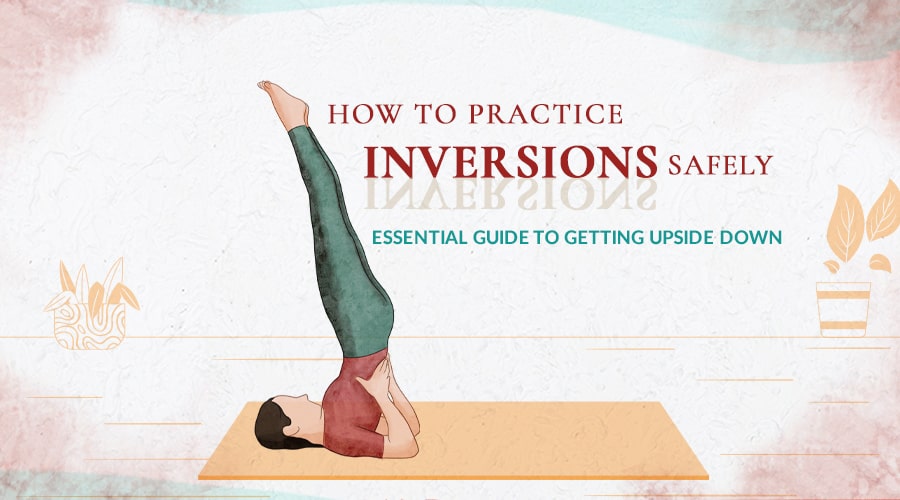
Yoga is a practice that is always challenging us, both on and off the mat. One facet of yoga that can be particularly hard to get your head around is yoga inversions. Inverted postures require us to to find our balance on our hands or heads, redefining our sense of gravity and challenging us to upgrade our abilities.
While spectacular to witness, inverted yoga poses offer more than just an Instagram-worthy shot. When practiced safely, they can have a profound effect on our mental and physical well-being, helping us build balance, flexibility, and strength in our practice.
In this essential guide to yoga inversions, we’ll break down the meaning of yoga inversions, benefits, potential risks, and effective inversion yoga poses with important modifications for a safer practice.
What Are Inversions in Yoga?
Yoga inversions are a type of yoga pose where your body is turned upside down with your head below either only your heart and hips (half inversion) or your heart and legs (full inversion). While tricky, inversions can offer a new perspective on your practice as well as a number of health benefits for the body and mind. Some of the most popular fully inverted postures include Headstand, Handstand, and Shoulderstand.
If you're not ready for those just yet, there are plenty of easier beginner yoga inversions (half inversions) you can try, like Downward-Facing Dog, Child’s Pose, and Dolphin pose. It's also important to start slowly and listen to your body. Make sure you have a qualified yoga teacher to guide and help you with proper alignment and technique.
What Muscles Do You Use for Inversion Yoga Poses?
Inversion yoga poses are an amazing way to strengthen and stretch different muscles in your body. When you practice inversions, you use a variety of muscles in your core, arms, legs, back, and shoulders to help support your body weight and maintain proper alignment and balance.
Some of the major muscles used in yoga inversions include:
1. Core Muscles
Your core muscles, including your rectus abdominis, obliques, and transverse abdominis, are essential for stabilizing your body during inversions. These muscles help you maintain a strong and stable base which is key to mastering inversions like the Forearm Stand.
2. Upper Body Muscles
Inversions also target the muscles in your upper body, including your shoulders, arms, and chest. In upside down yoga poses like Crane Pose, Bridge Pose, and Headstand, we rely on these muscles to support our body weight and ensure we don’t collapse.
3. Neck Muscles
Depending on the inversion, you may also use your neck muscles to support your head and neck. It's important to be careful not to strain your neck muscles during inversions, so always listen to your body and only go as far as feels comfortable.
4. Leg Muscles
Some inversions, like Headstand and Handstand, require you to engage your leg muscles to help lift your body up and maintain your balance. These muscles include your quads, inner thighs, hamstrings, and glutes.
Inversions can help you work major muscles throughout body, from your core to your arms and your legs. With regular practice, you'll build strength and flexibility, and unlock a new dimension of your practice.
What Are the Benefits of Yoga Inversions?
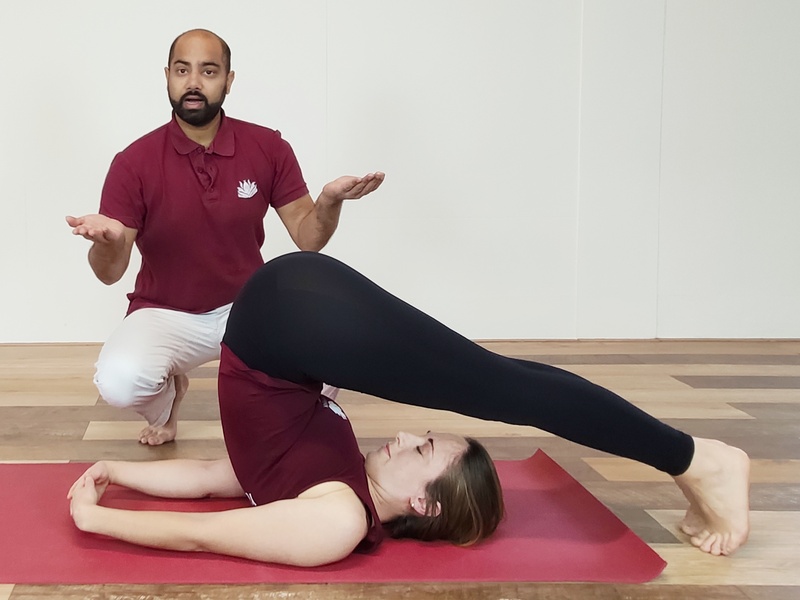
Although challenging, yoga inversions can offer an abundance of health benefits when incorporated into a balanced practice. As a result, many medical professionals today recommend inversion therapy to improve blood flow in the body and provide relief for chronic back pain, sciatica, and other conditions.
However, research suggests that a balanced yoga asana practice with inversions can be more effective in boosting your overall health and well-being. When incorporated into your daily practice, you can reap the following yoga inversions benefits:
1. Boosts Brain Health
Inverted yoga postures are renowned for their supercharging effect on the brain. When the body is inverted, gravity causes the blood to flow in the opposite direction, towards the head. This increased blood flow to the brain can improve cognitive function by 14% and counteract symptoms of mental illnesses like depression and anxiety. Additionally, inversions may also hold the power to halt the brain’s aging process and even delay dementia.
2. Regulates Blood Pressure
Many people practice yoga to reduce high blood pressure and hypertension. In the case of inversions, we can stimulate the body’s pressure gauges known as baroreceptors. These take pressure readings of the blood vessels and make suitable adjustments in blood pressure. The stimulation of these receptors boosts their responsiveness, which improves the body’s ability to regulate blood pressure. The reversed flow of blood and oxygenation that takes place in Headstand also gives the heart some time to rest and recharge, reducing the risk of heart disease.
It’s important to note that inversions can also increase blood pressure. Beginners who use too much muscular tension to hold themselves up activate the sympathetic nervous system instead, causing blood pressure to rise. For this reason, those who already suffer from high blood pressure are advised not to do inversions, unless carefully guided by an experienced yoga teacher and in agreement with their treating physician.
3. Stimulates the Lymphatic System
Inverted postures stimulate the lymphatic system, which is responsible for removing waste and toxins from the body. The lymphatic system relies on movement to circulate lymph fluid throughout the body, and inverted poses can facilitate this rejuvenating movement. Poses that compress the abdomen and stimulate the thoracic duct, such as Shoulderstand, can help drain lymph fluid and used blood from your legs.
3. Aids Digestion
Are inversions good for digestion? The answer is yes. Shoulderstand, Plough Pose, and Headstand are all recommended yoga poses for better digestion and gut health. When practiced comfortably, these inversions activate the rest and digest mode and release the pressure of gravity on the colon. This movement can also massage the visceral organs and flow new blood to the area.
4. Improves Thyroid Health
Yoga inversion postures like Shoulderstand and Plough Pose can help improve thyroid issues and reduce related symptoms. Inversions activate the parasympathetic nervous system which reduces stress and promotes the production of necessary thyroid hormones. These poses also increase blood circulation to the thyroid glands by pumping oxygen-rich blood to deprived areas through the squeeze-and-release effect.
5. Builds Strength and Balance
Balancing upside down requires a combination of strength, stability, and immense concentration. Over time, regular practice of inversions can help to increase upper body strength and improve overall muscular endurance. Inversions also challenge your sense of balance and movement in space. When the body is inverted, the brain must adapt to a new sensory input, which can help improve balance and coordination.
6. Calms the Mind
Holding an upside down posture for a minute might sound like the opposite of relaxing, but when practiced correctly, inversion yoga poses can have a calming effect on the mind. Inversions work to stimulate the parasympathetic nervous system, which is responsible for the body's rest and digest response. In this mode, we are able to relax, quiet the mental chatter, and let go of tension deep in our muscles.
By focusing on the breath and the body's movements, we can also become more present and focused, which can promote feelings of inner peace and serenity.
Experience authentic Hatha Yoga
Get free access to exclusive guided lessons with master teacher Kalyani Hauswirth-Jain
What Are the Risks of Yoga Inversions?
Although inversion yoga poses offer an abundance of benefits, they also come with a number of risks. If you have any medical conditions or concerns, it's important to consult with a healthcare provider before attempting inversions, especially if you have a pre-existing injury or suffer from high blood pressure.
It’s also a good idea to practice inversions under the guidance of a trained yoga teacher who can provide proper alignment and modifications for your individual needs. Practitioners with the following conditions should always consult a medical professional before jumping into yoga inversions:
- Neck, shoulder, and spine injuries
- Head Injuries
- Glaucoma or other eye conditions
- Hypertension
- Cardiovascular issues
- Arthritis or osteoporosis
- Brain injuries
- Lower-back and spinal issues (e.g. chronic pain, herniated disc, sciatica, SI-joint instability)
- Asthma or other breathing disorders
Who Should Not Do Yoga Inversions?
People with the aforementioned conditions should not do yoga inversions. However, there are various modifications that can make these postures more accessible which we explore in more detail below. If you decide to practice inversions with a prexisting health condition, it’s imperative that you get permission from your physician and progress gradually under the supervision of a professional yoga instructor.
Practitioners younger than seven and pregnant women should also avoid advanced yoga inversions like Headstand and Shoulderstand, as it puts too much pressure on the head, neck, and spine.
Can You Do Yoga Inversions While Menstruating?
Many students are taught that practicing yoga while menstruating is unhealthy and unsafe, especially inversions. Some people even believe that the upside down position might trigger the onset of endometriosis. The truth is, if you do not experience discomfort or have a pre-existing condition of endometriosis, it is perfectly fine to practice yoga inversions during menstruation.
How Long Should You Hold Yoga Inversions for?
Most yoga teachers will recommend a duration of 10- 30 seconds for balancing inversions, such as Handstand, and 1-2 minutes for steady inversions, such as the Headstand and Shoulderstand, to prevent wrist strain, dizziness, instability, and neck pain. A resting inversion like Child’s Pose or a Standing Forward Bend can be held for longer durations of up to 5 minutes or more.
Essentially, the most important aspect with any inversion is comfortability. You can hold a posture for any amount of time, as long as your body remains steady and you exert no forced effort to maintain the pose.
Inversions should also form part of a balanced practice. The duration should therefore be relative to other asanas and warming-up exercises that make up your practice. For example, in a basic Hatha Yoga sequence, you can practice several inversions in one session for a duration of 30 seconds to 1 minute.
Inversion Yoga Poses & Modifications for Safer Practice
Yoga inversions are a fantastic way to level up your practice. However, it’s important to practice these upside poses safely and modify as needed. Below, we break down fundamental inversion poses in yoga with modifications for a safe and well-balanced practice.
Incorporate these poses into your practice, and take note of the contraindications and cautions to minimize strain and injury. Remember to hold the posture comfortably without exerting too much effort. If you begin to feel discomfort or unsteady, slowly exit the pose and use the modifications to adjust the posture to your level and ability.
1. Child’s Pose (Shashankasana)
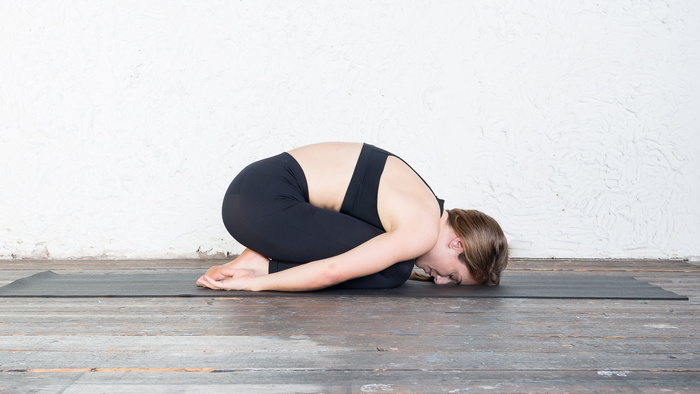
Child’s Pose is a relaxing asana that we practice before and after challenging inversions as it shifts the body from sympathetic to parasympathetic mode. This helps lower your heartbeat and respiration rates, promoting deeper states of inner balance and harmony in your practice. Child’s Pose is also the easiest yoga inversions for beginners, and a good place to start.
How to Do Child’s Pose:
- Sit on your knees, with your hips resting on your heels.
- Reach forward and place your forehead on the floor, with arms tucked in next to your body.
- Relax into the mat, keeping your hips on your heels. If your hips are lifting from the heels, separate your knees slightly.
- Let your shoulders, head, and back relax into the floor.
- Stay here for 30-45 seconds and focus on easy, abdominal breathing.
Modifications for Safe Practice:
- If your hips are not resting on your heels, make two fists and place them one atop the other. Then, rest your forehead on your topmost fist.
- You can also support your hips with a cushion or use a yoga block to prop up your head.
2. Standing Forward Folds
Standing Forward Folds are a great way to relieve neck and shoulder tension. These inversion yoga poses stretch the tissues in the body from the head down to the heels. Uttanasana also stimulates the Sacral Chakra to bring balance to the energy body.
Standing Forward-Bend Pose (Uttanasana)
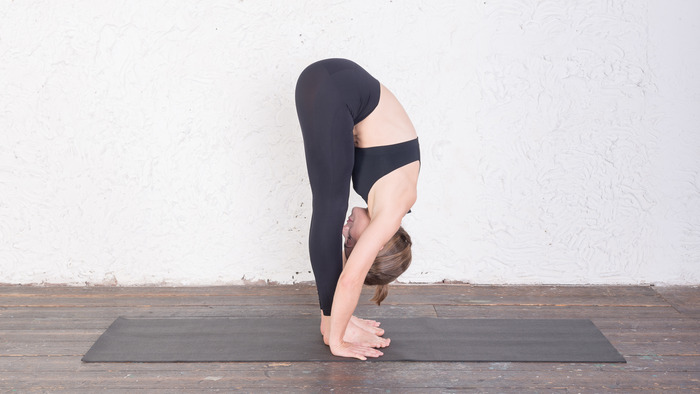
- Assume a standing position on your yoga mat, placing your feet close together or hip-distance apart.
- Inhale deeply and exhale, hinging at the hips and allowing your upper body to bend forward.
- If possible, keep the knees straight (allow your knees to bend if necessary) and rest your hands or fingertips on the ground, either in front of or beside your feet.
- On each inhale, raise and elongate the front part of your torso. Relax deeper into the forward bend as you exhale.
- Maintain a steady posture for as long as it feels comfortable and breathe calmly.
- To exit the pose, bend your knees, press your heels down, and gradually uncurl your spine, bringing your head and shoulders up last.
Modifications for Safe Practice:
- If you have high blood pressure, glaucoma, or detached retina you need to be cautious. You can either hold the pose for only short durations, or keep your chest lifted, by pushing your hands against the knees or using a yoga block to under your hands, keeping the torso parallel to the floor.
- If you have lower-back pain, spinal issues, sciatica, or hamstring injuries, it’s important to not forcefully pull yourself into the forward bend. Keep your back in a safe forward bend posture, with your lower spine long and chest slightly lifted to prevent back pain and strain.
Wide-Legged Forward Bend Pose A (Prasarita Padottanasana A)
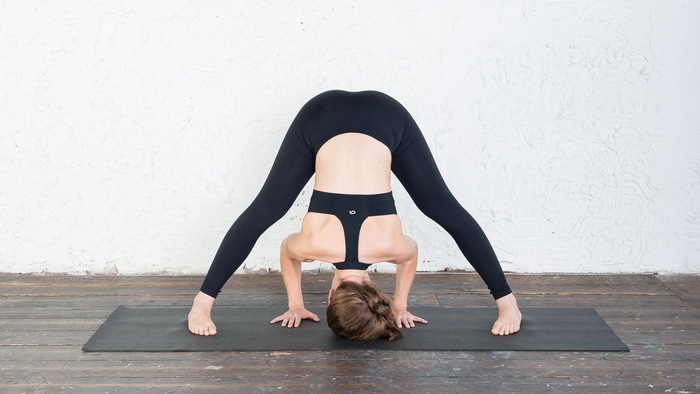
- Stand on your mat, with your feet wide and parallel (a little wider than your elbows, when your arms are extended sideways).
- Place your hands on your waist, inhale deeply, and elevate your chest, elongating the front part of your torso.
- Exhale and maintain the length of your front torso. Then, hinge forward from the hip joints until your torso is nearly parallel to the floor. Rest your fingertips on the ground in line with your shoulders.
- Lift your head while elongating the back of your neck and look up towards the ceiling or straight ahead.
- Exhale and bend your elbows, lowering your torso and head into a full forward bend.
- Walk your hands backward until your forearms are perpendicular to the floor.
- Take relaxed, even breaths and maintain the pose as long as it is comfortable.
Modifications for Safe Practice:
- If you have lower-back and spinal issues or hypertension, use a yoga block to support your hands and keep your torso parallel to the floor.
- If your hamstrings and buttocks are very tight, you can relieve tension on your lower back by bending your knees slightly. Be sure to keep your legs active and do not allow your knees to drop inwards.
3. Shoulderstand (Sarvangasana)
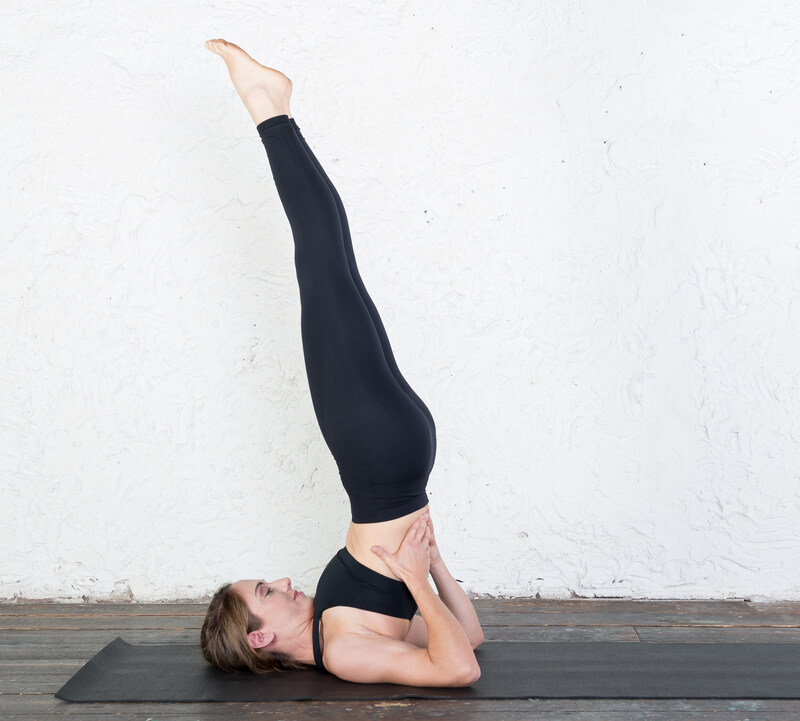
Known as the ‘queen of asanas’, the Shoulderstand is one of the most important inversion poses in Hatha Yoga. When held steadily and comfortably, Shoulderstands regulate blood pressure and activate your parasympathetic nervous system. This ensures proper functioning of all internal processes and hormonal balance. Shoulderstands also stimulate the Throat Chakra, promoting creativity, faith, and freedom of thought and speech.
How to Do Shoulderstand:
- Start by lying down on your back with your feet placed together and arms positioned alongside your body.
- Retain the position of your head and neck on the floor and inhale deeply as you raise both legs to a 90-degree angle.
- While lifting your hips towards the ceiling, rest your hands on your hips and move them towards your shoulder blades.
- Raise your hips as high as possible while drawing your chest towards your chin.
- Maintain the support of your hands to keep your back in a stable position and ensure that your feet end up directly above your head.
- Breathe slowly and deliberately while focusing on the region around your throat.
Modifications for Safe Practice:
- If you have any (minor) neck or shoulder issues, place a folded blanket 3–5 cm thick underneath your shoulders to release pressure on your neck, ensuring your neck is not resting on the blanket. This allows your body to straighten up, avoiding overflexion and strain of your neck.
- For Asthma or other breathing disorders, hold only for short durations. If it causes discomfort, nausea, or shortness of breath, skip this pose.
- If you have blood pressure issues, recent surgery or inflammation in your head region, an acute migraine or headache, or lower-back issues like sciatica, you can do the Legs-against-the-Wall Pose instead.
Legs-against-the-Wall Variation
- Lie on your back with your feet up the wall, ensure your butt touches the wall as well.
- Bend your knees and press your feet into the wall, slowly lifting your pelvis off of the floor (walk your feet up the wall to raise higher.)
- Rest your hands on your hips and move them towards your shoulder blades.
- Using the support of the wall, raise your hips as high as possible while drawing your chest towards your chin.
- Stablilize your back with your hands and lift your feet off of the wall, ensuring that they end up above your head.
- Keep your legs and feet relaxed, and hold the pose for as long as it's comfortable.
4. Headstand (Shirshasana)
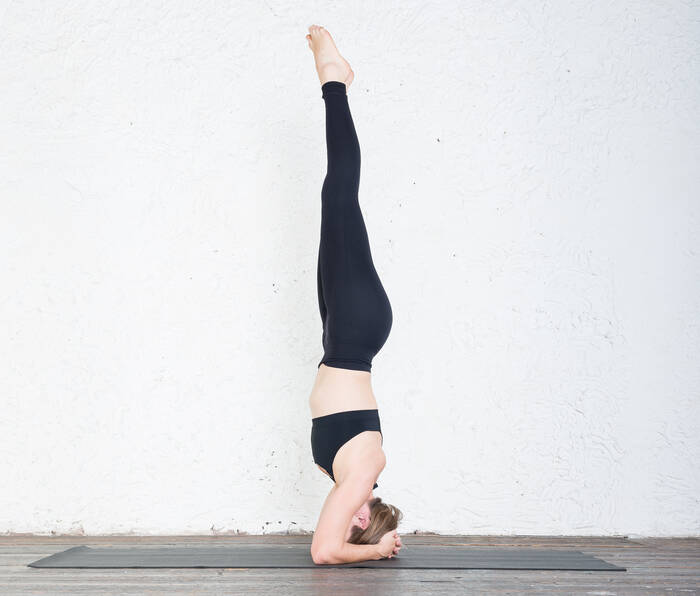
Aptly named ‘King of Asanas’, the Headstand boasts numerous health benefits, especially for the brain. The upside nature of this pose increases blood flow to the brain, boosting oxygen in the region and improving cognitive performance. This advanced yoga inversion pose also works to strengthen the upper body and improve the functioning of the pineal, hypothalamus, and pituitary glands.
How to Do Headstand:
- Begin sitting on your knees and hold your elbows to measure the width of your stance.
- Next, lower your arms to the ground, placing them directly underneath your shoulders while maintaining the position of your elbows.
- Bring your hands closer together and interlock your fingers, forming a triangle shape with your arms. Keep your elbows in.
- Place the back of your head in your hands and curl your toes while straightening your knees and raising your hips toward the sky.
- Slowly walk your feet towards your shoulders.
- Draw your right knee towards your chest, followed by the left knee, keeping your spine straight.
- Inhale and lift your legs towards the sky. Keeping them straight and your feet slightly in front of you.
- Focus your attention on a stable point, ideally at eye level.
- Take relaxed, deep breaths and hold the pose for as long as it is comfortable.
Contraindications:
- Hypertension
- Cardiovascular issues
- Neck and shoulder issues
- Recent surgery or inflammation in your head region
- Arthritis or osteoporosis
- Brain injuries
- Lower-back or spinal issues like sciatica
- Acute migraine or headache
Modifications for a Safe Practice:
- You should definitely avoid practicing the full headstand if any of the contradictions apply to you.
- However, if you have mild hypertension, back, neck or shoulder issues and your physician approves inversion postures like Headstand, you can practice the Easy Headstand for 10-30 seconds at a time. Be sure to practice only under the supervision of a qualified yoga instructor.
Easy Headstand
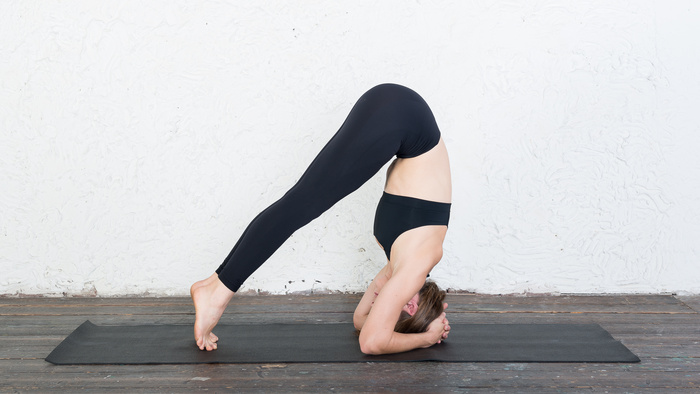
- Sit on your knees, with your hips resting on your heels, and hold your elbows to measure the ideal distance.
- Then bring your arms to the floor under your shoulders. Place your forearms on the floor and interlock your fingers.
- Place the top of your head on the floor, with the back of your head in your cupped hands.
- Curl your toes, straighten your legs, and walk as close toward your chest as possible.
- Push your elbows firmly into the floor and push your shoulders away from your ears.
- Keeping your feet on the ground, hold the pose steadily for as long as comfortable, and breathe evenly.
Modifications for Safe Practice:
- If your hamstrings or lower back is too tight, soften your knees and focus on keeping your neck elongated, drawing your shoulder blades away from your ears and toward your waist.
- Hold for this pose for a shorter duration. If this is too difficult still, you can use a block under your feet to elevate your hips higher up over your shoulders and to decrease roundness in your back.
Final Thought
Turning your world upside down with yoga inversions can provide a new perspective and enhance your health and well-being in remarkable ways. But as with any yoga practice, it's important to approach inversions mindfully, with awareness and respect for your body's limits.
So whether you're a seasoned yogi or a curious beginner, take the time to explore these yoga inversion poses in a safe environment and discover the transformative power of turning your practice upside down. Who knows what new insights and experiences might await you on the other side?

Experience authentic Hatha Yoga
Get free access to exclusive guided lessons with master teacher Kalyani Hauswirth-Jain

